


Existence of a permanent and complete picture of the atmosphere in the incubator at any time - is of great importance. This will not only reduce labor costs, but will respond immediately if something unexpected happens. Complete information about all the processes taking place in the incubator, data logging, configuration thermostats, warning through SMS messages all this provides a transmission line between the computer and the thermostat..
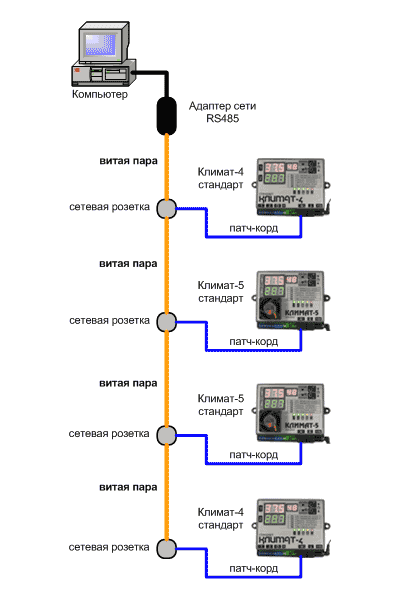
01Personal Computer
02Network adapter RS485
03Cable "twisted pair"
04Network outlets
05Connectors "patch cords"
06"KLIMAT Pro" Heating Controller
As the name implies, "twisted pair" - it's just a pair of wires, which are of equal length and twisted together. Network sockets under the "twisted pair" is a plastic box with a removable lid, the top of which is mounted mate RJ-45 connector. Network sockets are different categories, the most common of which are Category 3 and Category 5 to a wall outlet category 3 wires "twisted pair" is usually attached to the pads with screws. Into an outlet category 5 wires "twisted pair" are mounted spring-loaded contacts.
The general sequence of self-assembly of the local network.
01Secure the outlet on one of the walls of the incubator as close as possible to the thermostat.
02Starting from the first outlet.
03Take the cable "twisted pair" supplied with the thermostat.
04Cut the piece of cable 0.5 meters long by an RJ-45 connector. Put aside (it is useful in making a patch cord).
05Free from the outer tip of the remaining insulation cable "twisted pair" to a depth of 3 cm. and carefully unbraid conductors.
06Attach the conductors to the terminals according to the diagram socket cable termination.
07Route the cable to the attachment points RS485 network adapter, fixing it at regular intervals on the baseboard or wall mounting with special fixing brackets.
08Connect to the RS-485 network adapter.
09Take a new segment of the cable "twisted pair" of sufficient length, for installation the following outlet. Remove the outer insulation of the conductors and connect to the same outlet.
10Close the the outlet cover.
11Lay the cable to the place of mounting the following power outlet, fixing it at regular intervals on the baseboard or wall mounting with special fixing brackets.
12Follow steps 5 and 6, then 9, 10 and 11.
13Take previously cut off piece of the cable with the length of 0.5 meters with RJ-45 connector and crimp it to the other end of the RJ-45 connector on the color scheme of an existing connector.
14Make another three identical patch cords.
01Launch the program on your computer "KLASTER"
02Connect the fourth wall outlet with your heating controller via a patch cord.
03The screen displays heating controller with the number 1.
04Change, with the help of the program, the number of heating controller from 1 to 4.
05The screen displays heating controller with the number 4.
06Connect the third wall outlet with your heating controller via a patch cord.
07The screen displays heating controllers with the numbers 1 and 4.
08Change, with the help of the program, the number of heating controller from 1 to 3.
09The screen displays heating controllers with the numbers 3 and 4.
10Connect the second wall outlet with your heating controller via a patch cord.
11The screen displays heating controllers with the numbers 1, 3 and 4.
12Change, with the help of the program, the number of heating controller from 1 to 2.
13The screen displays heating controllers with the numbers2, 3 and 4.
14Connect the first wall outlet with your heating controller via a patch cord.
15The screen displays heating controllers with the numbers 1, 2, 3 and 4.


